Python tox - Why You Should Use It and Tutorial
Upgrade Your Python Project Tooling
Introduction
Most people in tech will have heard the classic “it works on my machine” excuse response, one so classic that it has
its own meme:
“It” may well work on your machine. But that’s probably not good enough when teammates and build servers need to run your Python code. tox fixes this problem (and quite a few others).
In this detailed post I’m going to delve into why tox can save you time and pain, how it works, and then go through some concrete code examples.
Let’s begin.
Contents
1. Why You Should Use tox
2. How tox Works
3. Basic tox Example
4. Multiple Python Version Example
5. Running Arbitrary Commands Example
6. Python Packaging Example
7. tox in Production - CI/CD Example
Here is the accompanying code repo on Github
1. Why You Should Use tox
The value of tox is pretty opaque at first. A glance at the tox documentation shows:
toxaims to automate and standardize testing in Python. It is part of a larger vision of easing the packaging, testing and release process of Python software.
Which sounds great and all, but doesn’t tell us much. If we keep reading we see that:
toxis a generic virtualenv management and test command line tool
Which can provoke the knee-jerk reaction of…what’s wrong with plain old virtualenv? Or its slightly more sophisticated cousin virtualenvwrapper? Surely you don’t want me to learn yet another tool? I had these same reservations. I was wrong. To explain more it’s useful to consider a scenario.
Let’s say that 10X Ninja Techlead Joe Smith writes a Python library to help his team do something - say a CLI tool for the team’s
key tasks. He’s a responsible ninja, so he writes some tests, and he creates a requirements.txt file. Everything runs fine and
he commits the code to the team’s version control system. The problem with Joe is that he’s never been that keen on writing documentation.
Later, when his colleague Kyle Bloggs wants to make a tweak to the CLI tool to add a new command, he clones the library, installs the
requirements in the requirements.txt file with pip,
then tries running pytest tests in the package and it does not work.
Ignoring the specifics of the error Kyle receives, what are some of the potential reasons why this might not work?
- Perhaps there’s a setup script/series of commands that needs to be run the prepare the library
- Similar to the above, it could be that certain environment variables are required to be set (such as adding the project
directory to the
PYTHONPATH) - It could be that unbeknownst to Kyle, Joe’s library is not compatible with Python 3.6 (because Joe only works at the bleeding edge), and that’s what Kyle has installed on his machine
- For whatever reason (he could be on another team for example), Kyle is using a different operating system and the setup bash script doesn’t work on that OS.
If you’ve worked on production Python systems, these potential issues should not seem far-fetched. They are very real. Crucially, you’ll
also note that the likes of virtualenv or virtualenvwrapper can do nothing to prevent them. Very detailed documentation can
mitigate some of these challenges to a certain extent, but that rapidly becomes impractical. What should Joe have done differently?
He should have used tox.
Fast forward a few weeks and now the team really likes the CLI tool (Kyle eventually got it running on his machine after a pair programming
session with Joe). They decide to set up a proper CI/CD process for the library,
using their automated build system of choice. At this point, Joe is going to have to write a bunch of boilerplate setup code to make sure
what happened to Kyle doesn’t happen to the build system. Typically, this will involve bash scripts where directories are navigated to,
environment variables are set, setup scripts are run, and any other steps that are required to run the project are codified for the build system.
At this point, another quote from the tox documentation jumps out:
acting as a frontend to Continuous Integration servers, greatly reducing boilerplate and merging CI and shell-based testing.
Now, if you’ve never looked at tox before, the penny should be starting to drop. If the penny still remains stubbornly wedged, then
consider the sort of boilerplate Joe will have to write if the team wishes to test the library against multiple versions of Python.

OK, so how does tox help us with the scenario above?
tox makes it easy to:
- Test against different versions of Python (which would have alerted Kyle that the library hadn’t been tested against his install version).
- Test against different dependency versions
- Capture and run setup steps/ad hoc commands (which Kyle could have made a mistake on / not known about)
- Isolate environment variables - By design,
toxdoes not pass any evars from the system. Instead you are asked to explicitly declare them (which would have alerted Kyle to any environment variable requirements). - Do all the above across Windows / macOS / Linux (which would have saved Kyle if the issue had been due to the OS)
And tox will have done all of these things with a clean syntax which the team can lift and drop in their CI config to reduce the boilerplate there.
I’m not saying this is a silver bullet (my search for such a thing continues) and I’m sure any scarred creative developer
can come up with other ways things could have gone wrong not covered here. However, tox has clearly improved our chances
of a smooth setup and reduced boilerplate in our build automation. This is very good.
In our new online course “Testing and Monitoring Machine Learning Models in Production”, Sole Galli
and I were careful to use tox. In previous courses, students would often get stuck when setting the PYTHONPATH environment variable on Windows
when they cloned the course repo and tried to run it locally. Now all this has been abstracted away with tox, which has massively
reduced student confusion. There are only so many times you can explain how to set an environment variable on Windows and remain sane.
2. How Does tox Work?
The tox documentation presents us with this diagram of the tox workflow:
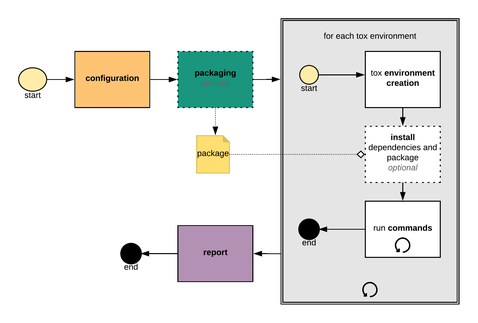
OK - so what does all this mean?
You can think of tox as a kind of combination of virtualenvwrapper and Makefile.
Based on a config file (which we’ll look be looking at in the upcoming sections):
toxgenerates a series virtual environments- Installs dependencies for each environment (which are defined in config)
- Runs setup commands (which are also defined in config) for each environment
- Returns the results from each environment to the user.
You’ll find all tox’s hidden magic in the .tox directory that gets created as soon as you run any tox commands.
So you could think of running tox as the equivalent of:
virtualenv .tox/my_envsource .tox/my_env/activate(my_env) pip install some dependencies(my_env) .tox/my_env/prepare_something.sh(my_env) pytest .tox/my_env/tests_dir
This is a bit contrived and simplified (for example later we’ll consider tox’s usefulness for packaging), but I think it can be a useful clarification. Over the course of this article I’ll gradually ratchet up the complexity.

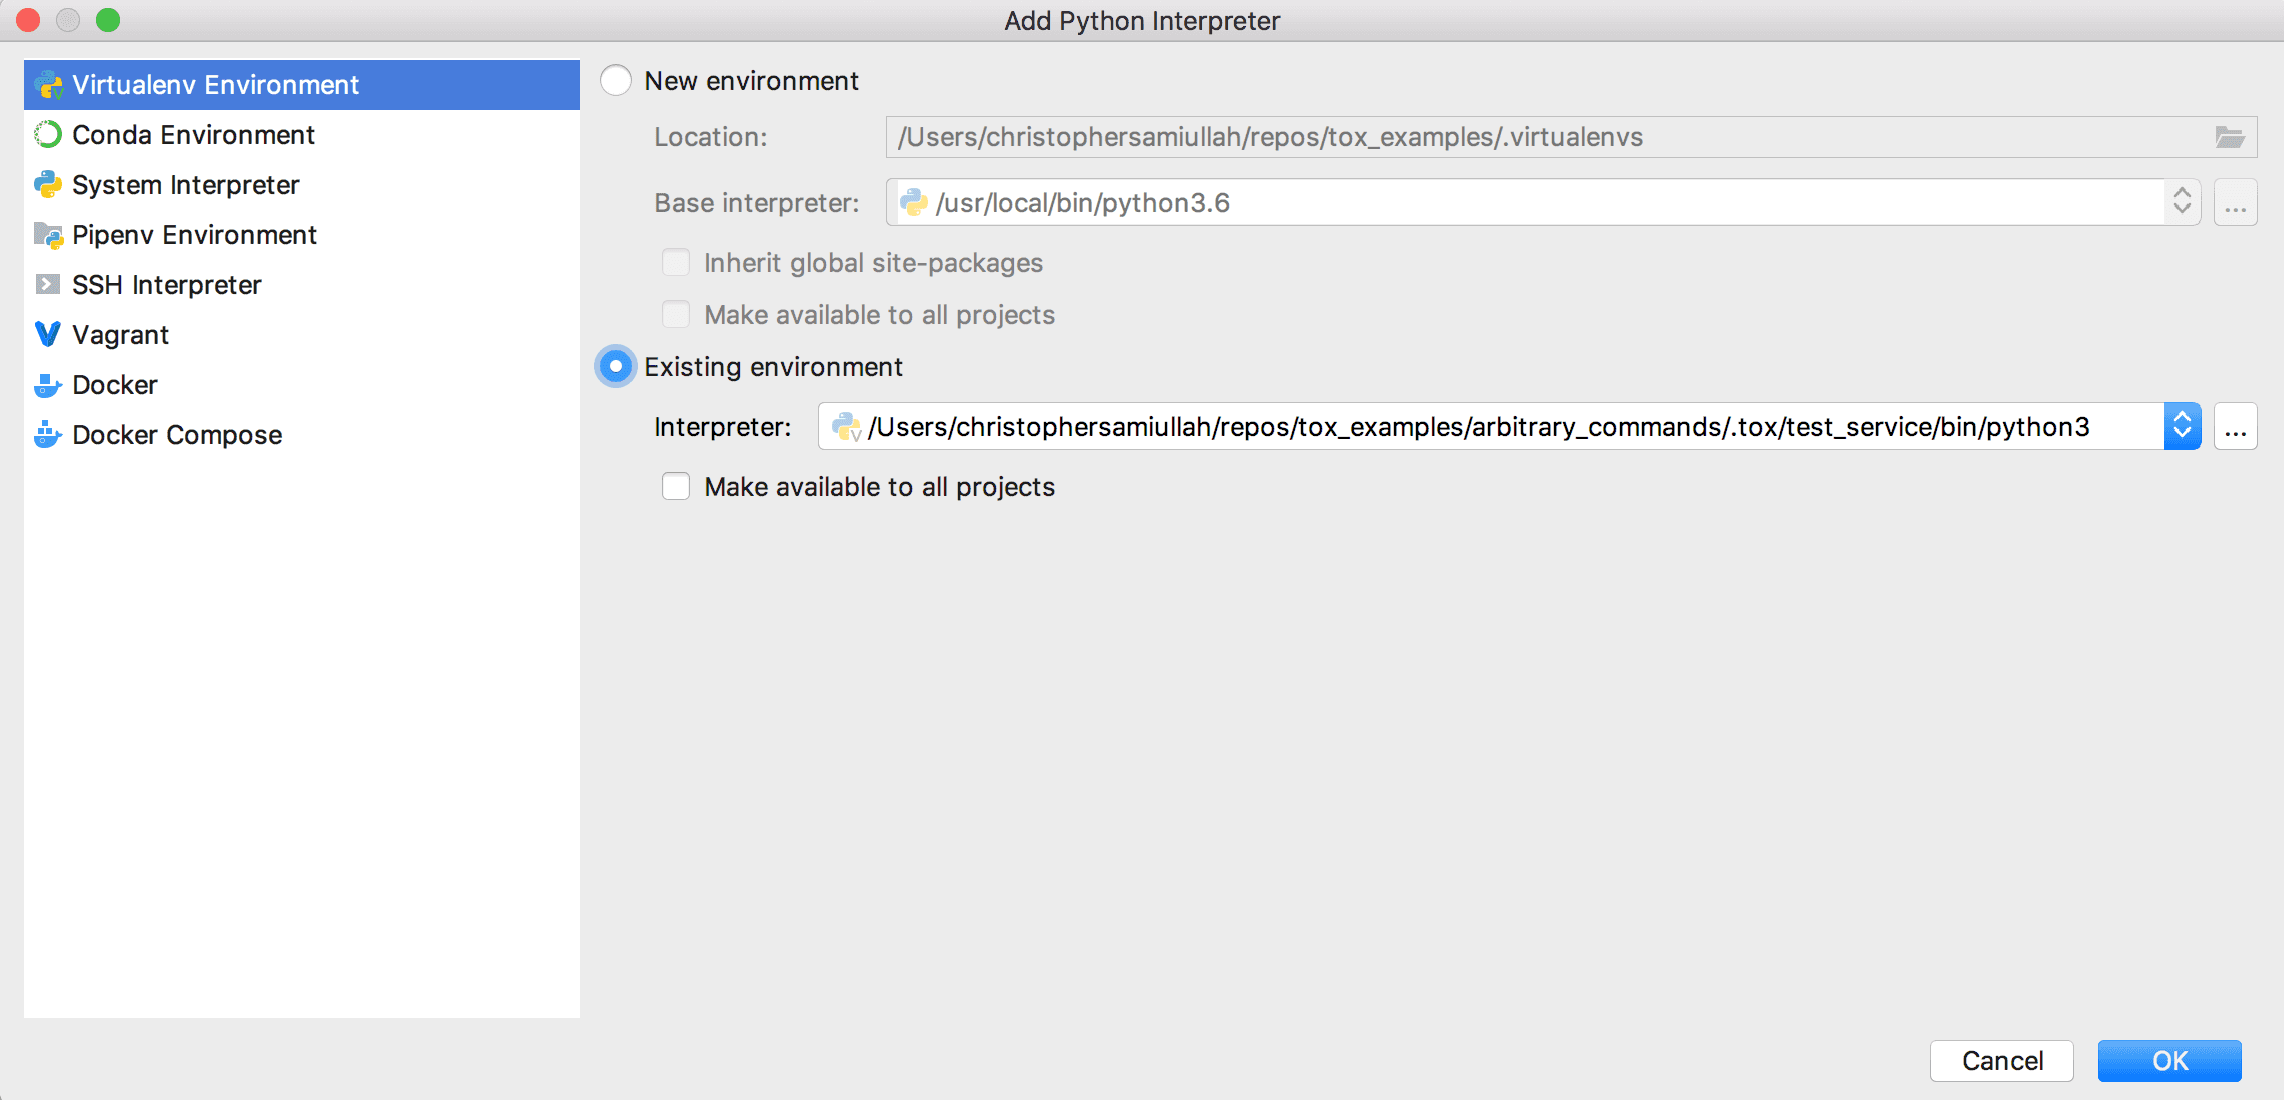
Note
The .tox directory of tox includes a Python installation, so if you are working with PyCharm then you can configure your project to look for its Python interpreter in that directory, as shown in this screenshot:
3. A Basic tox Example
Time for some code! You can clone this tox examples repo I put together if you prefer to browse it all locally. We start by looking at the tox_examples/basic scenario which has these files:
├── basic
│   ├── __init__.py
│   ├── squarer.py
│   ├── test_squarer.py
│   └── tox.ini
At the heart of tox is the config file.
As per the tox docs:
“At the moment tox supports three configuration locations prioritized in the following order:
- pyproject.toml
- tox.ini
- setup.cfg”
However, a glance at the issues shows ongoing debate about the merits of the pyproject.toml format,
so I’m sticking with the more familiar tox.ini format (which is also what you’ll find in the likes of
flask, django and
numpy.
Here is our very basic tox.ini file:
[tox]
envlist = my_env
skipsdist = true

[testenv]
deps = pytest
commands = pytest
What’s happening here then? As per the INI file structure,
square brackets denote a “section”, and in tox that translates to the config for a particular test environment. The global settings
are in the first [tox] section. In this basic setup, we just have two items in our global settings:
-
The
envlistwhich tells tox which environments to run when the commandtoxis entered to the command line. In our basic example heremy_envis the name of the environment we will find in the .tox directory after running thetoxcommand. -
skipsdist which we need to set when we are not testing a Python package (e.g. for a service or simple set of scripts). Anytime
toxdoesn’t find asetup.pyfile this flag will need to be set. If you don’t set it you will see this error:
ERROR: No pyproject.toml or setup.py file found. The expected locations are:
  /Users/christophersamiullah/repos/tox_examples/basic/pyproject.toml or /Users/christophersamiullah/repos/tox_examples/basic/setup.py
You can
  1. Create one:
     https://tox.readthedocs.io/en/latest/example/package.html
  2. Configure tox to avoid running sdist:
     https://tox.readthedocs.io/en/latest/example/general.html
  3. Configure tox to use an isolated_build
Next, we have our test settings, defined within the [testenv] section. Note that testenv is a special keyword. If you were
to replace this with another variable, the tests would not run. Within this section we define:
depswhich are the dependencies required to run our tests - in this case simply pytestcommandswhich are the commands that will be triggered as part of the run for this environment. Because we specifypytesthere, the pytest default behavior means that any Python files with “test” in the name will be passed to the test runner.
That’s our config defined. Now let’s create some toy files to demonstrate tox in action. I’m going to create a highly sophisticated
Mathematical module called squarer.py which squares a number. And people wonder why NASA let me go.
# squarer.py

def square(n: float) -> float:
    """Square a number."""
    return n**2
‘Nuff said.
Then I’m going to test this module with a file called test_squarer.py which looks like this:
from .squarer import square


def test_square():
    # When
    subject = square(4)

    # Then
    assert subject == 16
With these basic files defined, all that is left to do is run tox (from the same directory where the tox.ini file is located),
at which point you should see our 1 test passing:
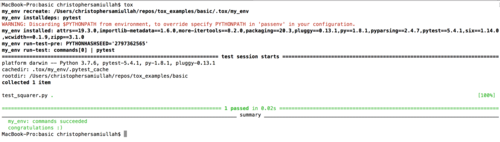
The first time you run the command, it will take some time as the virtualenv has to be created and the dependencies need to be installed.
After the first run, unless you change the config, then rerunning the tox command only takes a second or two.
The eagle-eyed amongst you will note a warning in the screenshot, we’ll come back to that later when we talk about passing and setting environment variables.
Note that tox is not tied to pytest - you could equally configure commands which would run the tests using
the Python standard library unittest framework. In fact, you
can run any arbitrary commands with tox, it doesn’t have to be just for testing. We’ll look at this shortly.
4. Multiple Python Version Example
If people have heard of tox, it’s usually for the feature of being able to test against multiple Python versions.
There’s no doubt that this is one of tox’s killer features, but tox is good for much more than just multiple version testing.
Nonetheless, it’s worth reviewing this functionality since it is key for the maintainability of many Python libraries.
In the Github repo, let’s now turn to the multipython directory, which has the same structure as our basic directory.
├── multipython
│   ├── __init__.py
│   ├── squarer.py
│   ├── test_squarer.py
│   └── tox.ini
In this example, we’ve modified our tox.ini file:
[tox]
envlist = py37,py27
skipsdist = true

[testenv]
deps = pytest
commands = pytest
Our envlist now contains “py37” and “py27” which are tox default test environment names. These defaults will instruct
tox to look for Python 3.7 and Python 2.7 wherever it is being executed, and create environments with those
versions of Python. For a full list of default envs, see this page in the tox documentation
where you’ll note that options also include other implementations of Python such as Jython.
Given that our earlier example used type hints (which are not part of Python 2.7), this means we need to modify our
squarer.py script to remove the type hints.
def square(n):
    """Square a number."""
    return n**2
Once we’ve done that, we can now run tox and we should see tests passing for both environments (assuming you have
Python 3.7 and Python 2.7 installed on your machine already):
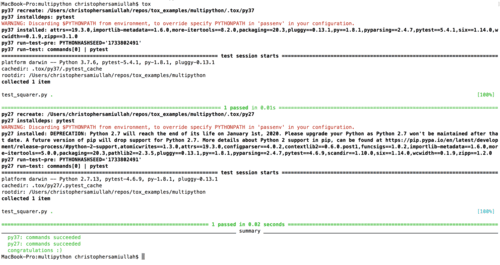
And there we have it, we’re now able to test our project easily on multiple versions of Python. This is particularly great for CI (see complex examples at the end of the post). Time to reveal more - let’s move on to a more complex example…
5. Running Arbitrary Commands in tox Example
Recall our squarer.py module. Now we imagine that a keen engineer decides that rather than using Math, it would be
better to run this calculation using a machine learning model trained on text data from every Math textbook online.
This questionable implementation serves as a useful excuse to explore running some non-test commands in tox. If we turn to
the example repo arbitrary_commands directory, we have filled things out a little more:
├── arbitrary_commands
│   ├── requirements.txt
│   ├── squarer
│   │   ├── __init__.py
│   │   ├── ml_squarer.py
│   │   └── squarer.py
│   ├── tests
│   │   ├── __init__.py
│   │   ├── test_ml_squarer.py
│   │   └── test_squarer.py
│   └── tox.ini
We’ve now graduated from a single dependency to also relying on numpy. As a result, we have a requirements.txt file. We’ve also
split our tests and logic into separate directories. We’ve added our new ml_squarer with the following code:
import numpy as np


def train_ml_squarer() -> None:
    print("Training!")


def square() -> int:
    """Square a number...maybe"""
    return np.random.randint(1, 100)


if __name__ == '__main__':
    train_ml_squarer()
It’s possible we haven’t yet reached the state-of-the-art with our machine learning implementation, but hey, we can at least
learn about tox ;)
In the
tox.ini file we’ve returned back to our basic envlist (with just one version of Python), but expanded it in other ways:
[tox]
envlist = test_service
skipsdist = true

[testenv]
install_command = pip install {opts} {packages}
basepython= python3.7

[testenv:test_service]
deps =
    -rrequirements.txt

setenv =
  PYTHONPATH=.

commands =
    python squarer/ml_squarer.py
    pytest tests


[testenv:train_model]
envdir = {toxworkdir}/test_service

deps =
    {[testenv:test_service]deps}

setenv =
  {[testenv:test_service]setenv}

commands =
    python squarer/ml_squarer.py
Now we have three separate sections (ignoring the global one). In the base [testenv] we establish our install command, as
well as our basepython version which defines our default Python version.
Next, we define a new environment with this syntax [testenv:test_service] and note that this is included in the envlist of
the global settings (which means that it will be run whenever we call tox) Key things to note from this section:
- We pass the requirements.txt file to the dependencies of the
test_serviceenvironment - We set the
PYTHONPATHto the current directory using thesetenvconfig - this isn’t strictly necessary for this particular scenario, but it is a good habit to get into. Alternatively we could pass system evars usingpassenv. - In our commands list, we now include a call to
ml_squarerwhich will trigger our ML model “training”. In this scenario we assume that the tests cannot run unless the model has been trained (although it could easily be the other way around, where we want to run some of the tests before training the model).
Finally, we define an additional environment called [testenv:train_model], and you’ll note that this is able to inherit
from the previous environment in both the deps and setenv configuration, which makes the file much more succinct. Note also that
for this environment we define the envdir as the same as the test_service environment. This means that pip will not have to
reinstall the dependencies, making the setup faster.
When you run tox now you should see an output like this:
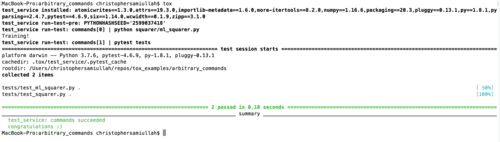
You’ll notice that our train_model environment was not used, and this is because we have not included it in our global envlist.
If we want to select it, we can pass it into tox like so:
tox -e train_model
This can be useful for storing arbitrary commands that you may wish to perform on an ad-hoc basis, such as downloading translations or
moving test result output files to a storage location. tox is great for running things like project linting and mypy type hint checks, and
integrates with projects like precommit.
6. Python Packaging Example
If we decide to publish our squarer as a library (the world can’t live without this tool!), then we can unleash the full power
tox. If we turn to the “packaging” directory of the example repo, we find the following directory structure:
└── packaging
    ├── setup.py
    ├── squarer
    │   ├── __init__.py
    │   ├── ml_squarer.py
    │   └── squarer.py
    ├── tests
    │   ├── __init__.py
    │   ├── test_ml_squarer.py
    │   └── test_squarer.py
    └── tox.ini
We’ve now added a setup.py file where we specify our numpy dependency. In our tox.ini file this means we remove the
skipsdist=true line, and as a result when we run tox:
python setup.py sdistis run- The package (“squarer”) is installed in the tox virtualenv
For scenarios where tests need to be run against an installed package, this is ideal.
Gotchas / Potential Issues
There is a danger of using a stale tox venv. One of tox’s weaknesses is its inability to
track changes in the dependencies in the setup.py and/or requirements.txt files. This is something to keep in mind.
When you have made such a change, always be sure to pass the tox -r (recreate) flag so that the environments are…you guessed it,
recreated. There is a tox plugin called tox-battery which can help to mitigate
this gotcha, via tracking of requirements.txt changes.
Most CI build tools have the ability to track changes on specific files for caching purposes, so this tox limitation is really only relevant for local development.
7. Using tox in Production
The syntax for adding tox to your Continuous Integration system of choice will vary, but here is an example of using tox in a CircleCI config file (disclaimer, I am a co-author of the online course this code is from). Notice that the steps which need to be defined in the CI tests are relatively minimal:
- base docker image
- working directory
- upgrade pip
- install tox
- run tox
Done. This is much cleaner than multiple calls to create virtualenvs, run shell scripts, etc. But I’m getting repetitive here, so that’s
probably the call to signal things up. Other useful sources of inspiration to look at are tox.ini files in major open source projects,
here’s a small sample to consider:
Hopefully now you see the value of tox and know how to get started in your own projects.
There’s plenty I haven’t covered here: running tests in parallel, generative envlists, factor-conditional settings and much more.
Good luck!
Other Decent tox Tutorials on the Web
- This post remains the most comprehensive post I’ve found on tox - great for more advanced devs
- This post covers more of the alternatives to tox and its pros and cons
- This post considers integrating tools such as flake8 with tox
- This guide has useful examples
- More advanced tips
Further tox
- Checkout the tox plugins for additional functionality
- The nox project may also be of interest, as it is similar to
toxbut uses Python files for config. I’ve not used it so I can’t comment.